`
# Hard Drive Resurrection
When I was a child, long before I could comprehend what a computer actually was, I was pressing the buttons on my father's laptop. It was a late 1990's Toshiba T3300SL.
Eventually, I figured out some input which turned the machine into a brick. It would no longer boot and didn't seem to recognize its hard drive.
Apparently, there wasn't enough important information on the hard drive to warrant attempting to find the fault and repair the machine, so it went to the wayside and became a prop in my childhood play antics.
As such, it endured a lot of rough handling in the years following. I distinctly remember it falling off of a counter a not-insignificant number of times.
Eventually, it ended up on my bedroom shelf and sat there until it came time to move out of that house in 2017. Now in college studying computer science, when I saw the machine I thought that surely I was
better with computers than a toddler and could return the drive to a working state at least for long enough to recover its contents onto a new drive.
### Disassembly
Unfortunately, many photos in this writeup are pictures taken of screens. I know this is sacrilege, but I didn't take on this project with the goal of creating a writeup and was also doing the majority of this work on live USB based systems.
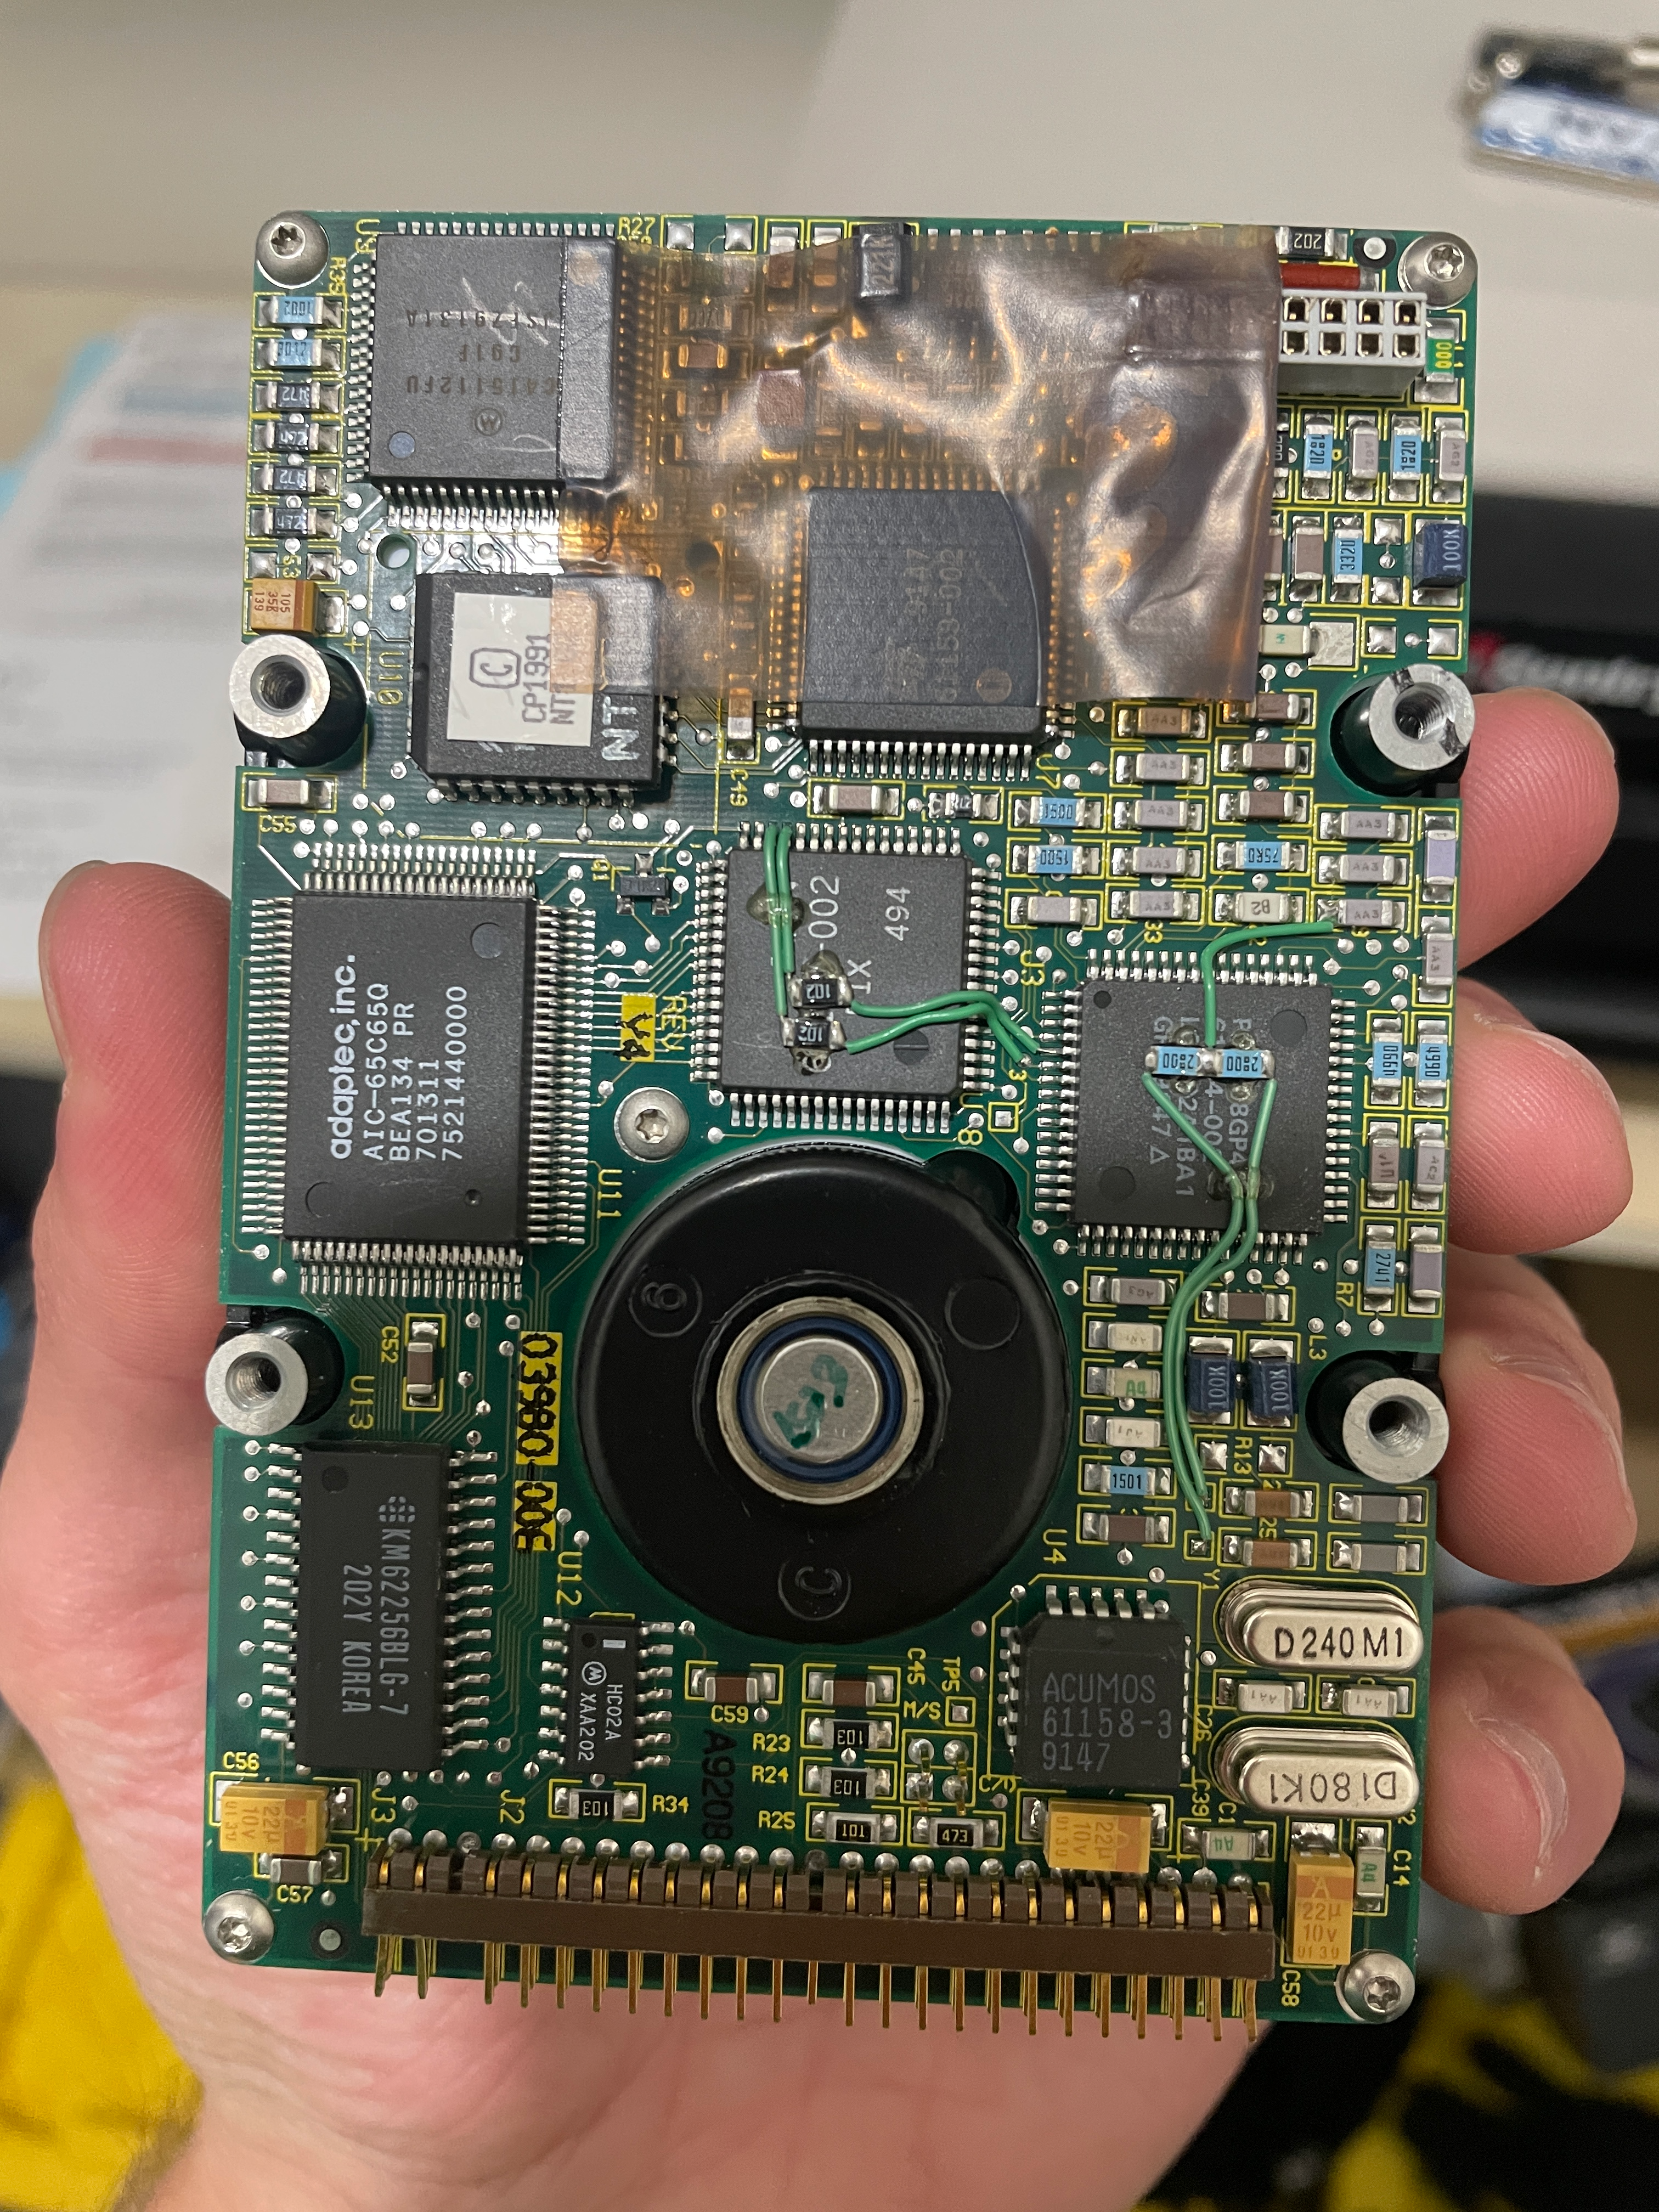 It may be an artifact of manufacturing at the time, but I was interested by what appear to be some hand wired connections running over the top of a few of the chips and jumping pins
The first step as always was to look on Amazon to see if I could get an adapter overnighted to me in order to fulfill the instant gratification I was seeking on what I thought would be a fairly easy project. I pictured the workflow would shape up to be along the lines of
1) Plug in hard drive
2) Use a program to read all of the bytes rather than trying to mount the drive as I figured when I was a child I may have overwritten the partition table and the drive had a small enough capacity for this to be a feasible course of action
3) Reconstruct the files based on the data that was scraped off
Once the 44 pin IDE to USB adapter arrived, I plugged it in and connected the drive to my Mac. The good news was that it appeared to power on and sounded like it was spinning up. Unfortunately the drive wasn't recognized so I switched it to my Windows desktop. On Windows, the drive wouldn't mount but it was detected by the Device Manager, albeit with the disk size being misinterpreted as being 2.20 terabytes.
It may be an artifact of manufacturing at the time, but I was interested by what appear to be some hand wired connections running over the top of a few of the chips and jumping pins
The first step as always was to look on Amazon to see if I could get an adapter overnighted to me in order to fulfill the instant gratification I was seeking on what I thought would be a fairly easy project. I pictured the workflow would shape up to be along the lines of
1) Plug in hard drive
2) Use a program to read all of the bytes rather than trying to mount the drive as I figured when I was a child I may have overwritten the partition table and the drive had a small enough capacity for this to be a feasible course of action
3) Reconstruct the files based on the data that was scraped off
Once the 44 pin IDE to USB adapter arrived, I plugged it in and connected the drive to my Mac. The good news was that it appeared to power on and sounded like it was spinning up. Unfortunately the drive wasn't recognized so I switched it to my Windows desktop. On Windows, the drive wouldn't mount but it was detected by the Device Manager, albeit with the disk size being misinterpreted as being 2.20 terabytes.
 I searched forums for Linux distributions which specialized in hard drive recovery. Despite this being a known Windows hard drive, I was working under the assumption that any structured data on it was beyond repair and that my best shot would be Linux's low level interfacing with the actual hardware to read back the data bit by bit.
 After taking a break on the project, when I plugged the drive back in it would start for a few seconds and then power its self off.
I searched for the issue online to see if anyone had come across similar symptoms. It sounded like Conner drives have a known issue with the read arm bumpers becoming sticky. As the rubber used inside the hard drive plate enclosure deteriorated it would become sticky. Then if the read arm doesn't move for an extended period of time, the rubber gets tacky enough that the read arm motor is unable to break it free.
This was the first major roadblock in the project. Everyone always says that hard drives are ruined as soon as you open the case and expose the platters to air. However, if I didn't do this then there was no chance at all of recovering the data, so it was a risk I needed to take. After unscrewing and opening the platter case I tried to move the arm and it was indeed stuck. Using a hex key in one of the holes of the arm, I broke the arm free so that it could move on its own power again. Guides online suggested covering the sticky rubber bumpers with something like a small piece of painters tape, but I didn't have the piece needed to disassemble the arm assembly enough to access the bumpers so I just relied on the arm being moved frequently enough to not adhear to itself again.
After taking a break on the project, when I plugged the drive back in it would start for a few seconds and then power its self off.
I searched for the issue online to see if anyone had come across similar symptoms. It sounded like Conner drives have a known issue with the read arm bumpers becoming sticky. As the rubber used inside the hard drive plate enclosure deteriorated it would become sticky. Then if the read arm doesn't move for an extended period of time, the rubber gets tacky enough that the read arm motor is unable to break it free.
This was the first major roadblock in the project. Everyone always says that hard drives are ruined as soon as you open the case and expose the platters to air. However, if I didn't do this then there was no chance at all of recovering the data, so it was a risk I needed to take. After unscrewing and opening the platter case I tried to move the arm and it was indeed stuck. Using a hex key in one of the holes of the arm, I broke the arm free so that it could move on its own power again. Guides online suggested covering the sticky rubber bumpers with something like a small piece of painters tape, but I didn't have the piece needed to disassemble the arm assembly enough to access the bumpers so I just relied on the arm being moved frequently enough to not adhear to itself again.
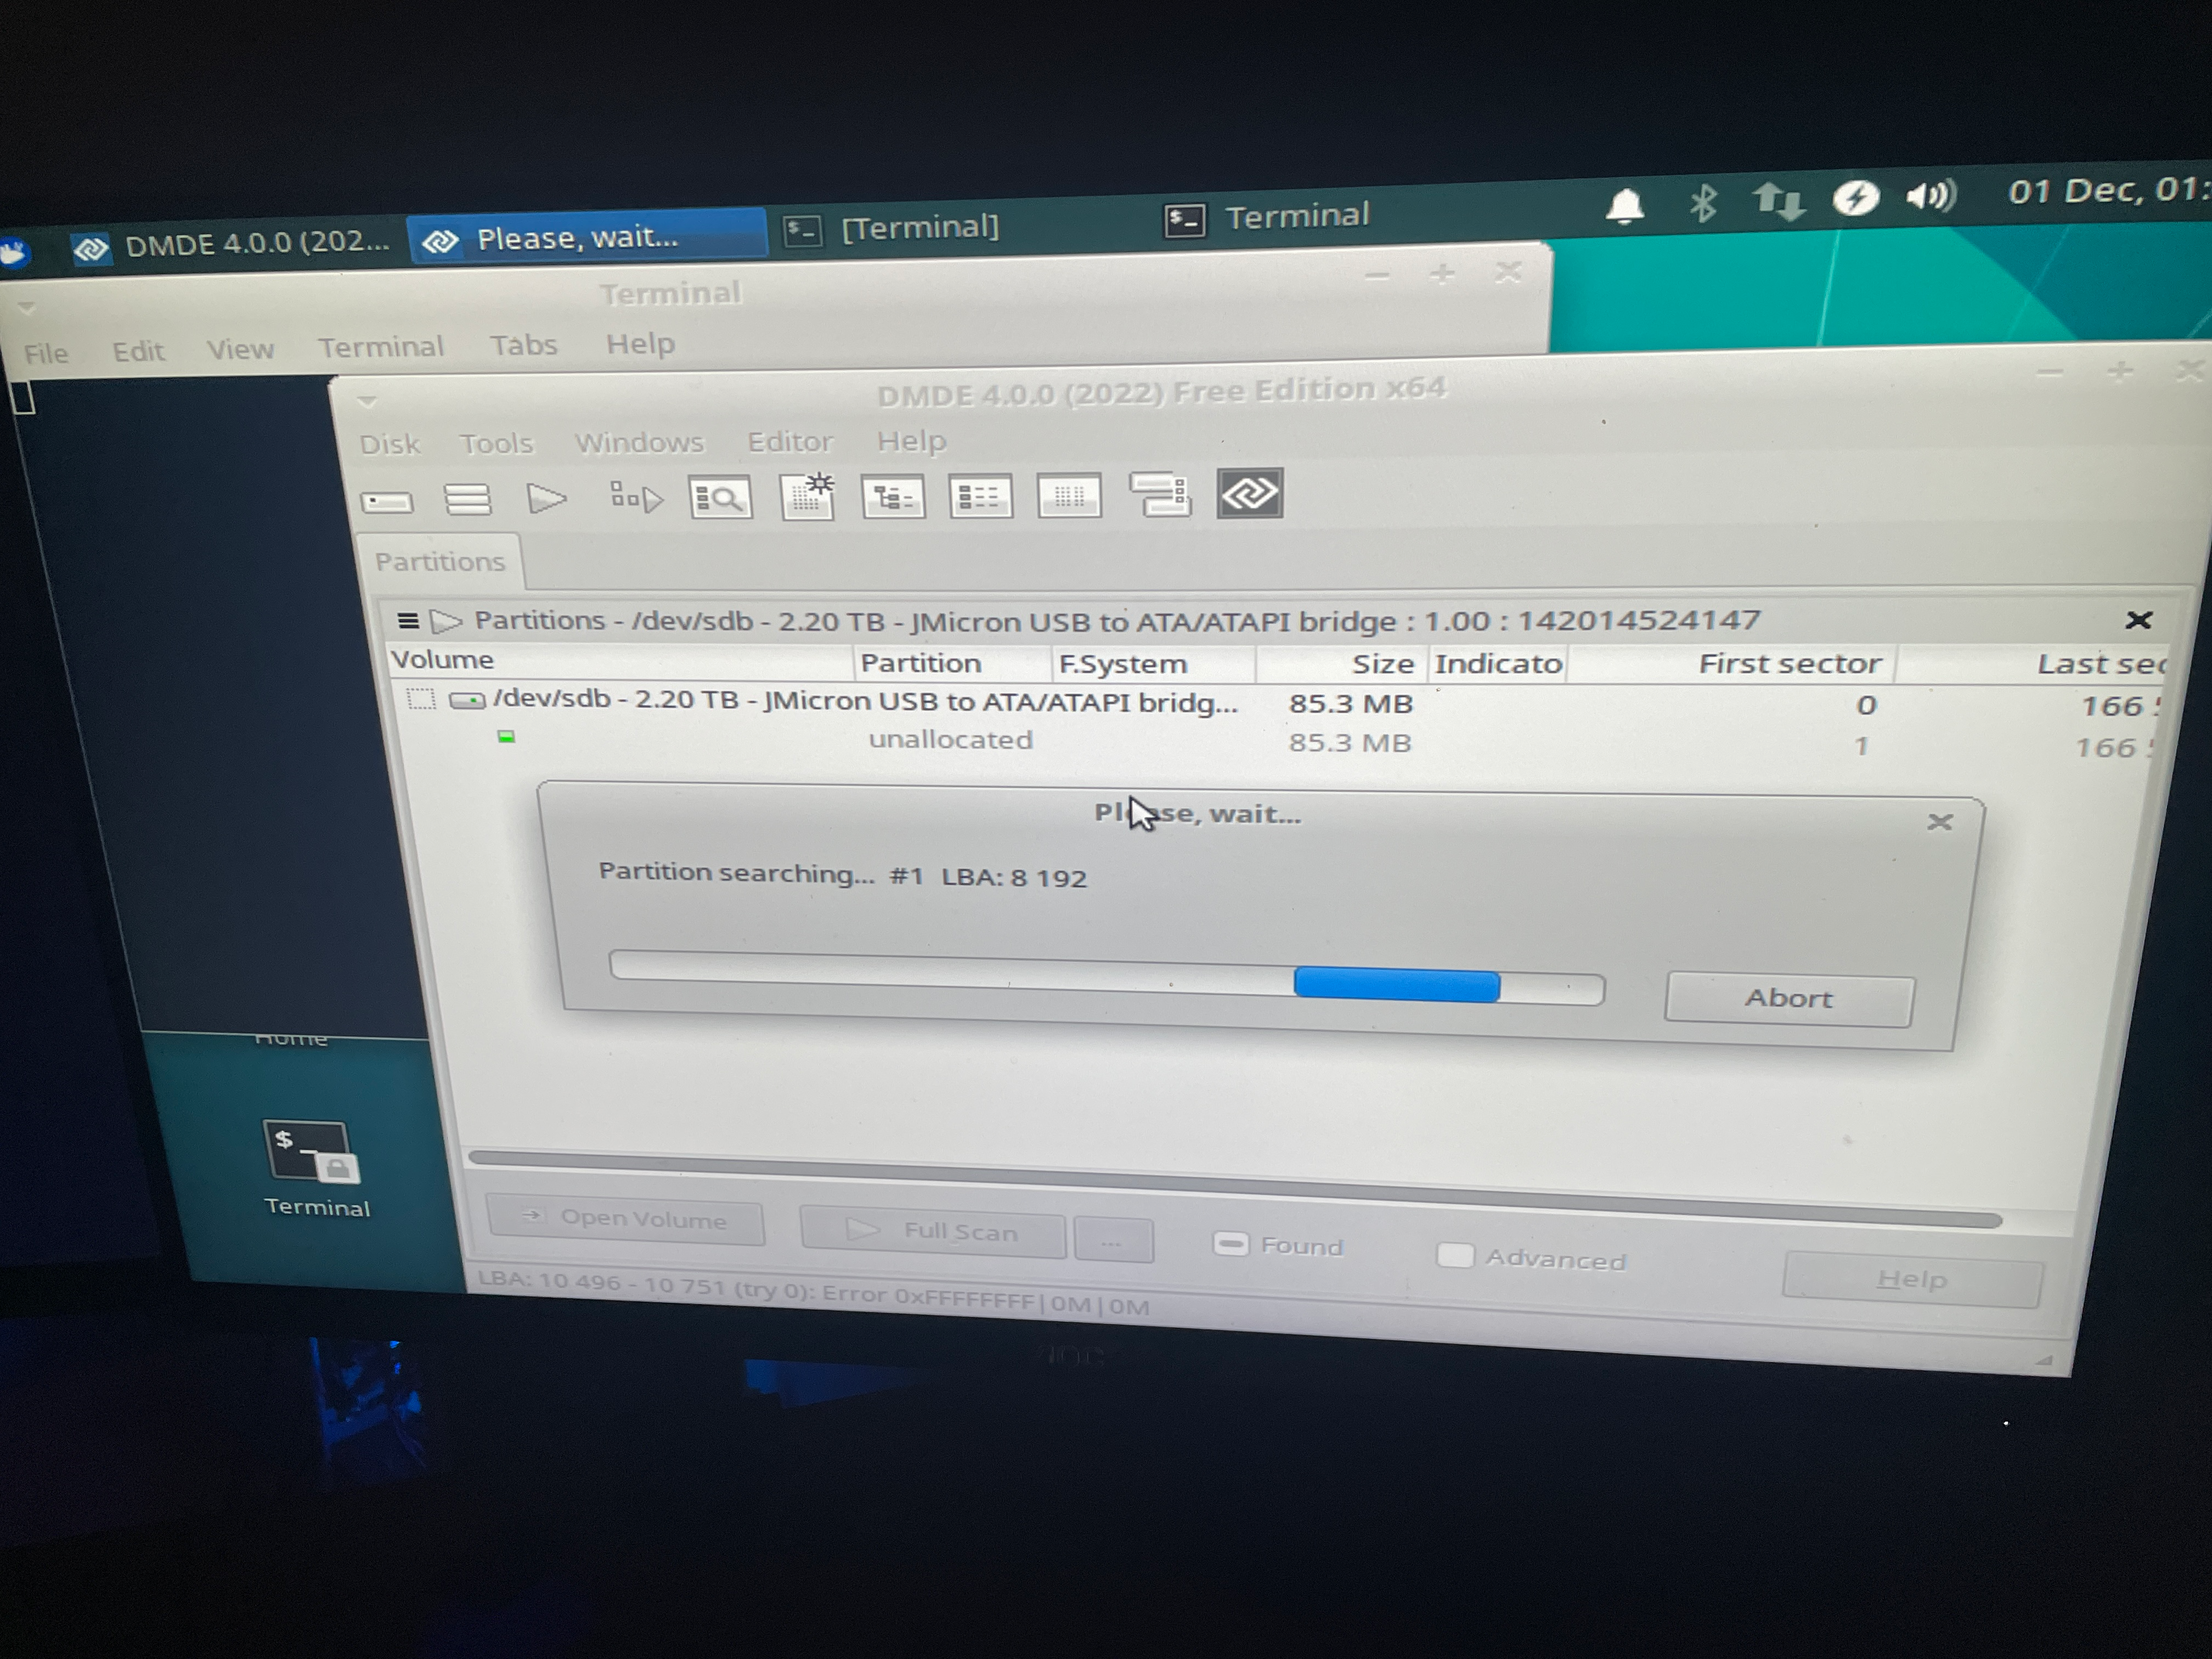
 I started playing around with hard drive recovery tools that people were recommending online. Some worked better than others. Many didn't detect the drive at all. DMDE was by far the best of the ones I had worked with.
Using DMDE, I began scraping the drive block by block in order to override any software/firmware partitioning issue which I may have destroyed
The results began to show readable strings starting at LBA 525/Block 515.
I started playing around with hard drive recovery tools that people were recommending online. Some worked better than others. Many didn't detect the drive at all. DMDE was by far the best of the ones I had worked with.
Using DMDE, I began scraping the drive block by block in order to override any software/firmware partitioning issue which I may have destroyed
The results began to show readable strings starting at LBA 525/Block 515.
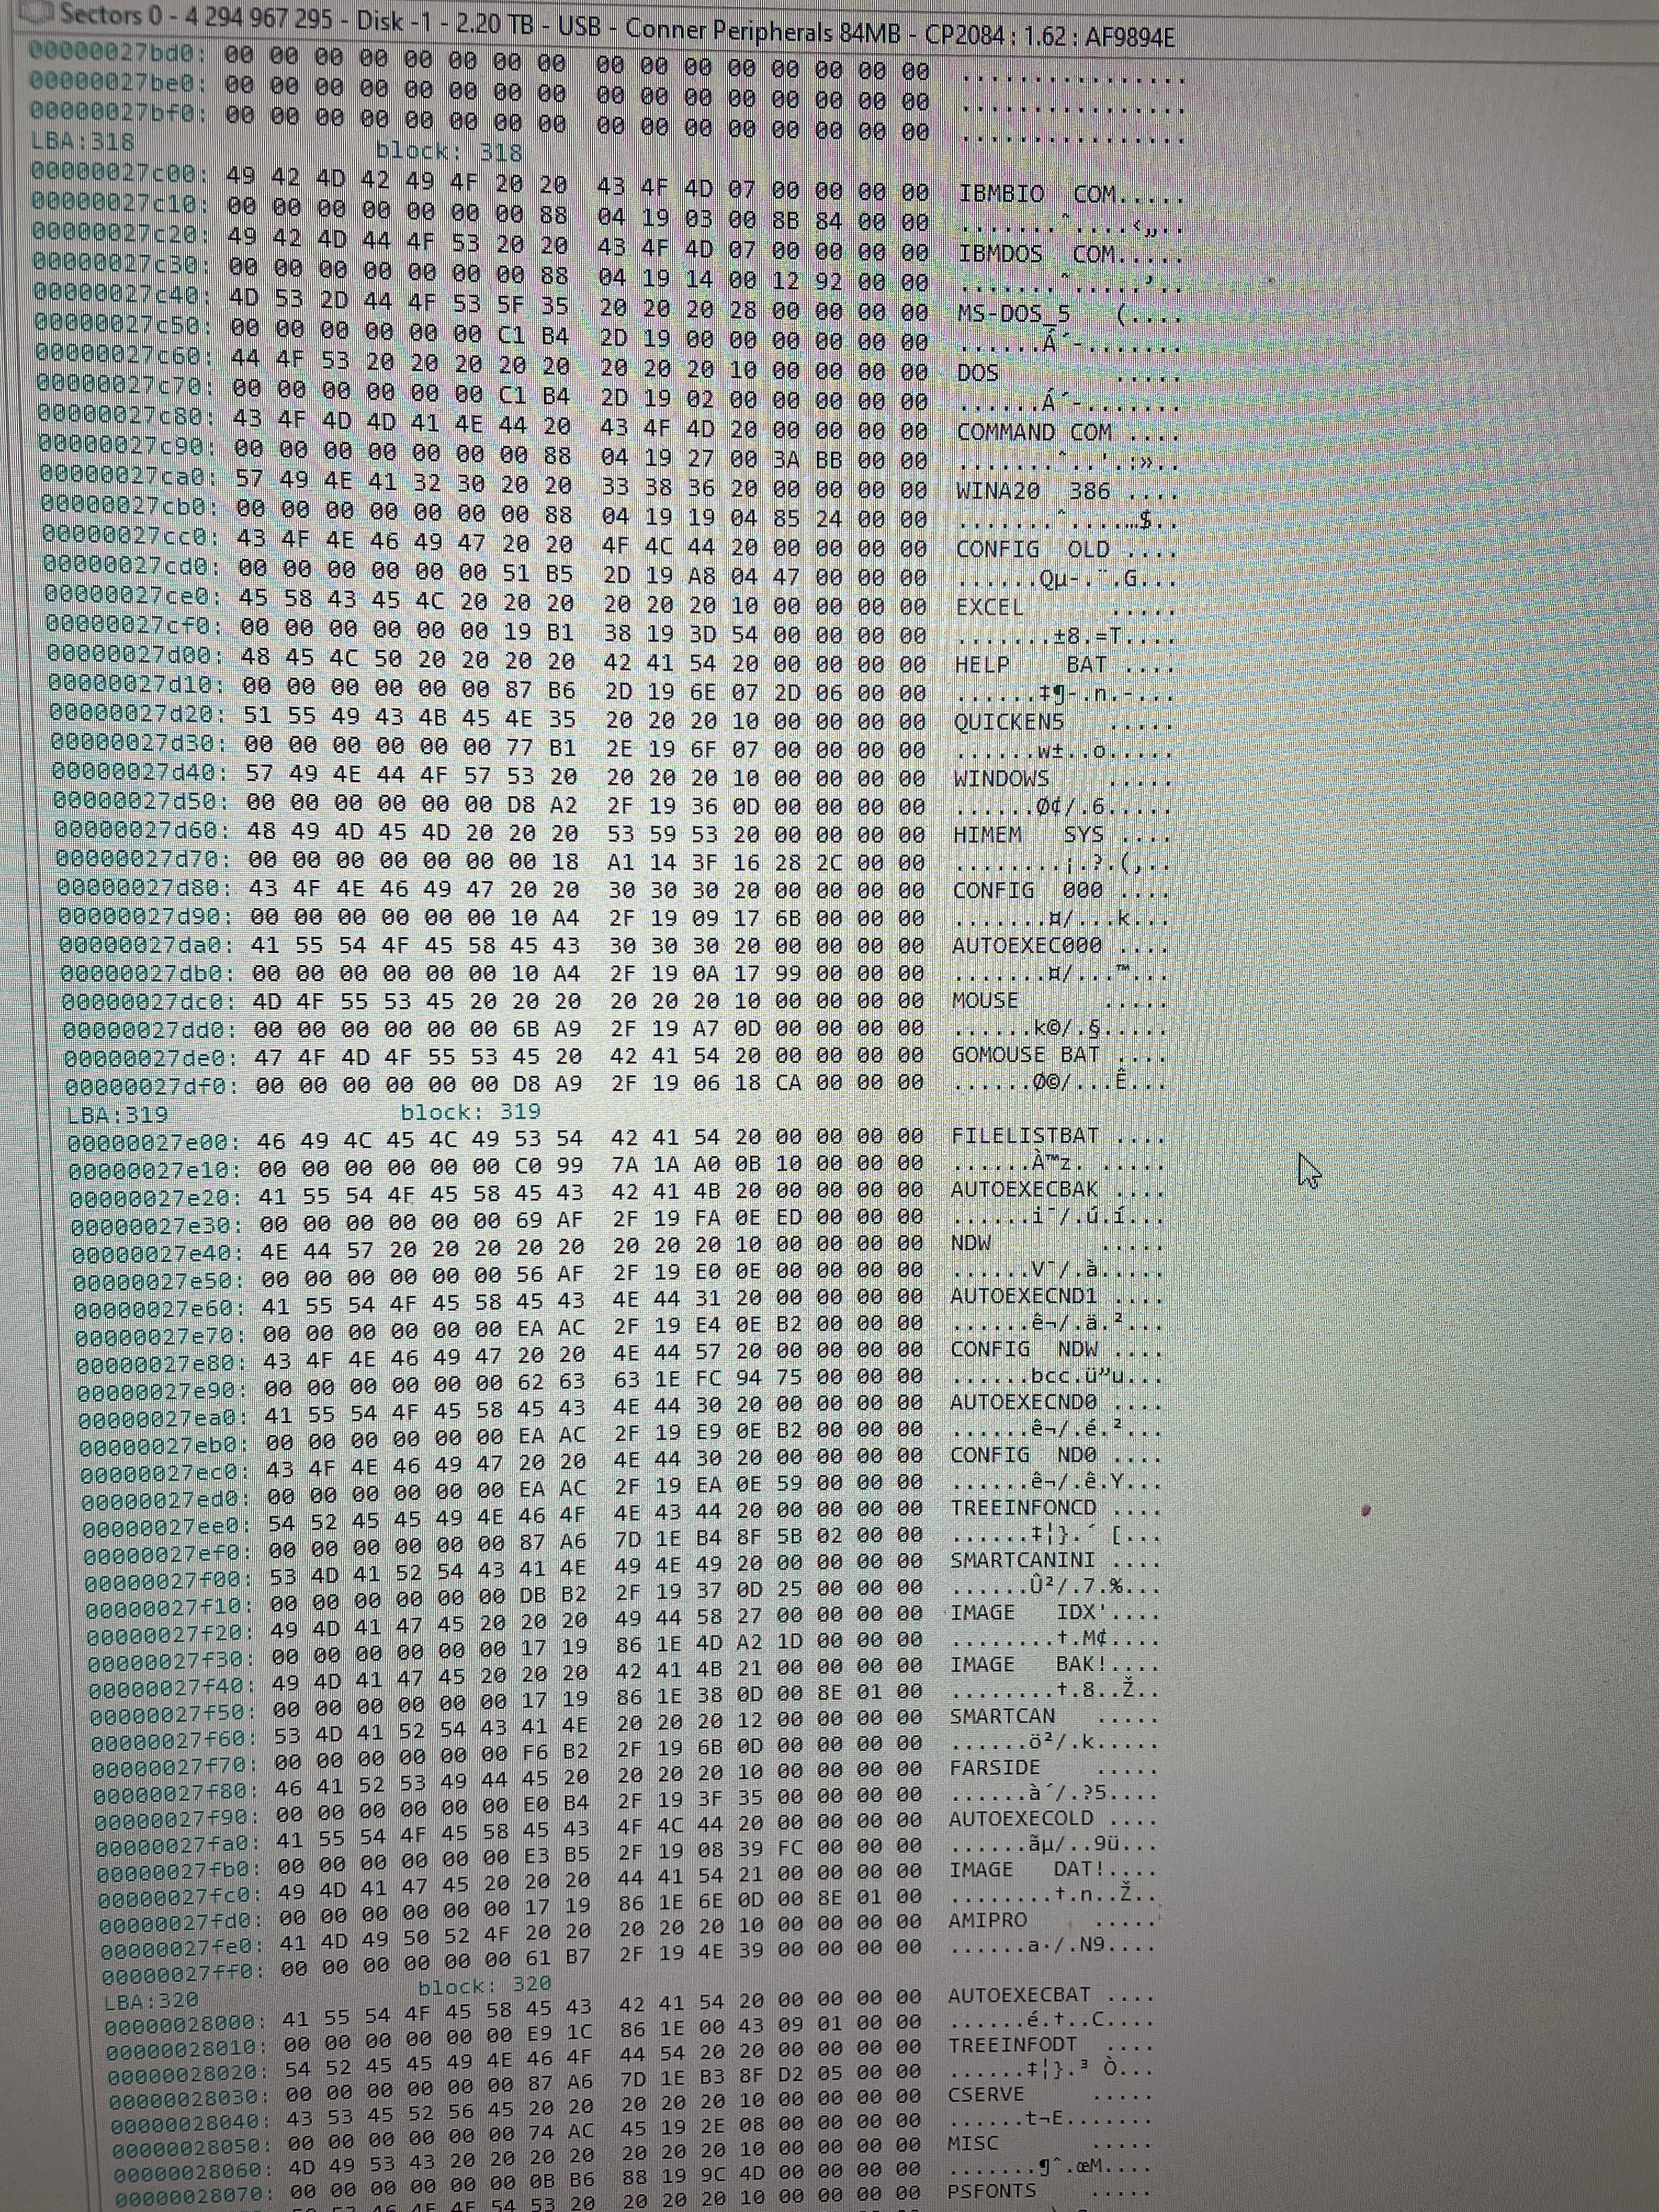
 Soon I started seeing some executables being discovered
 There were large chunks inside of the exe's of the following string:
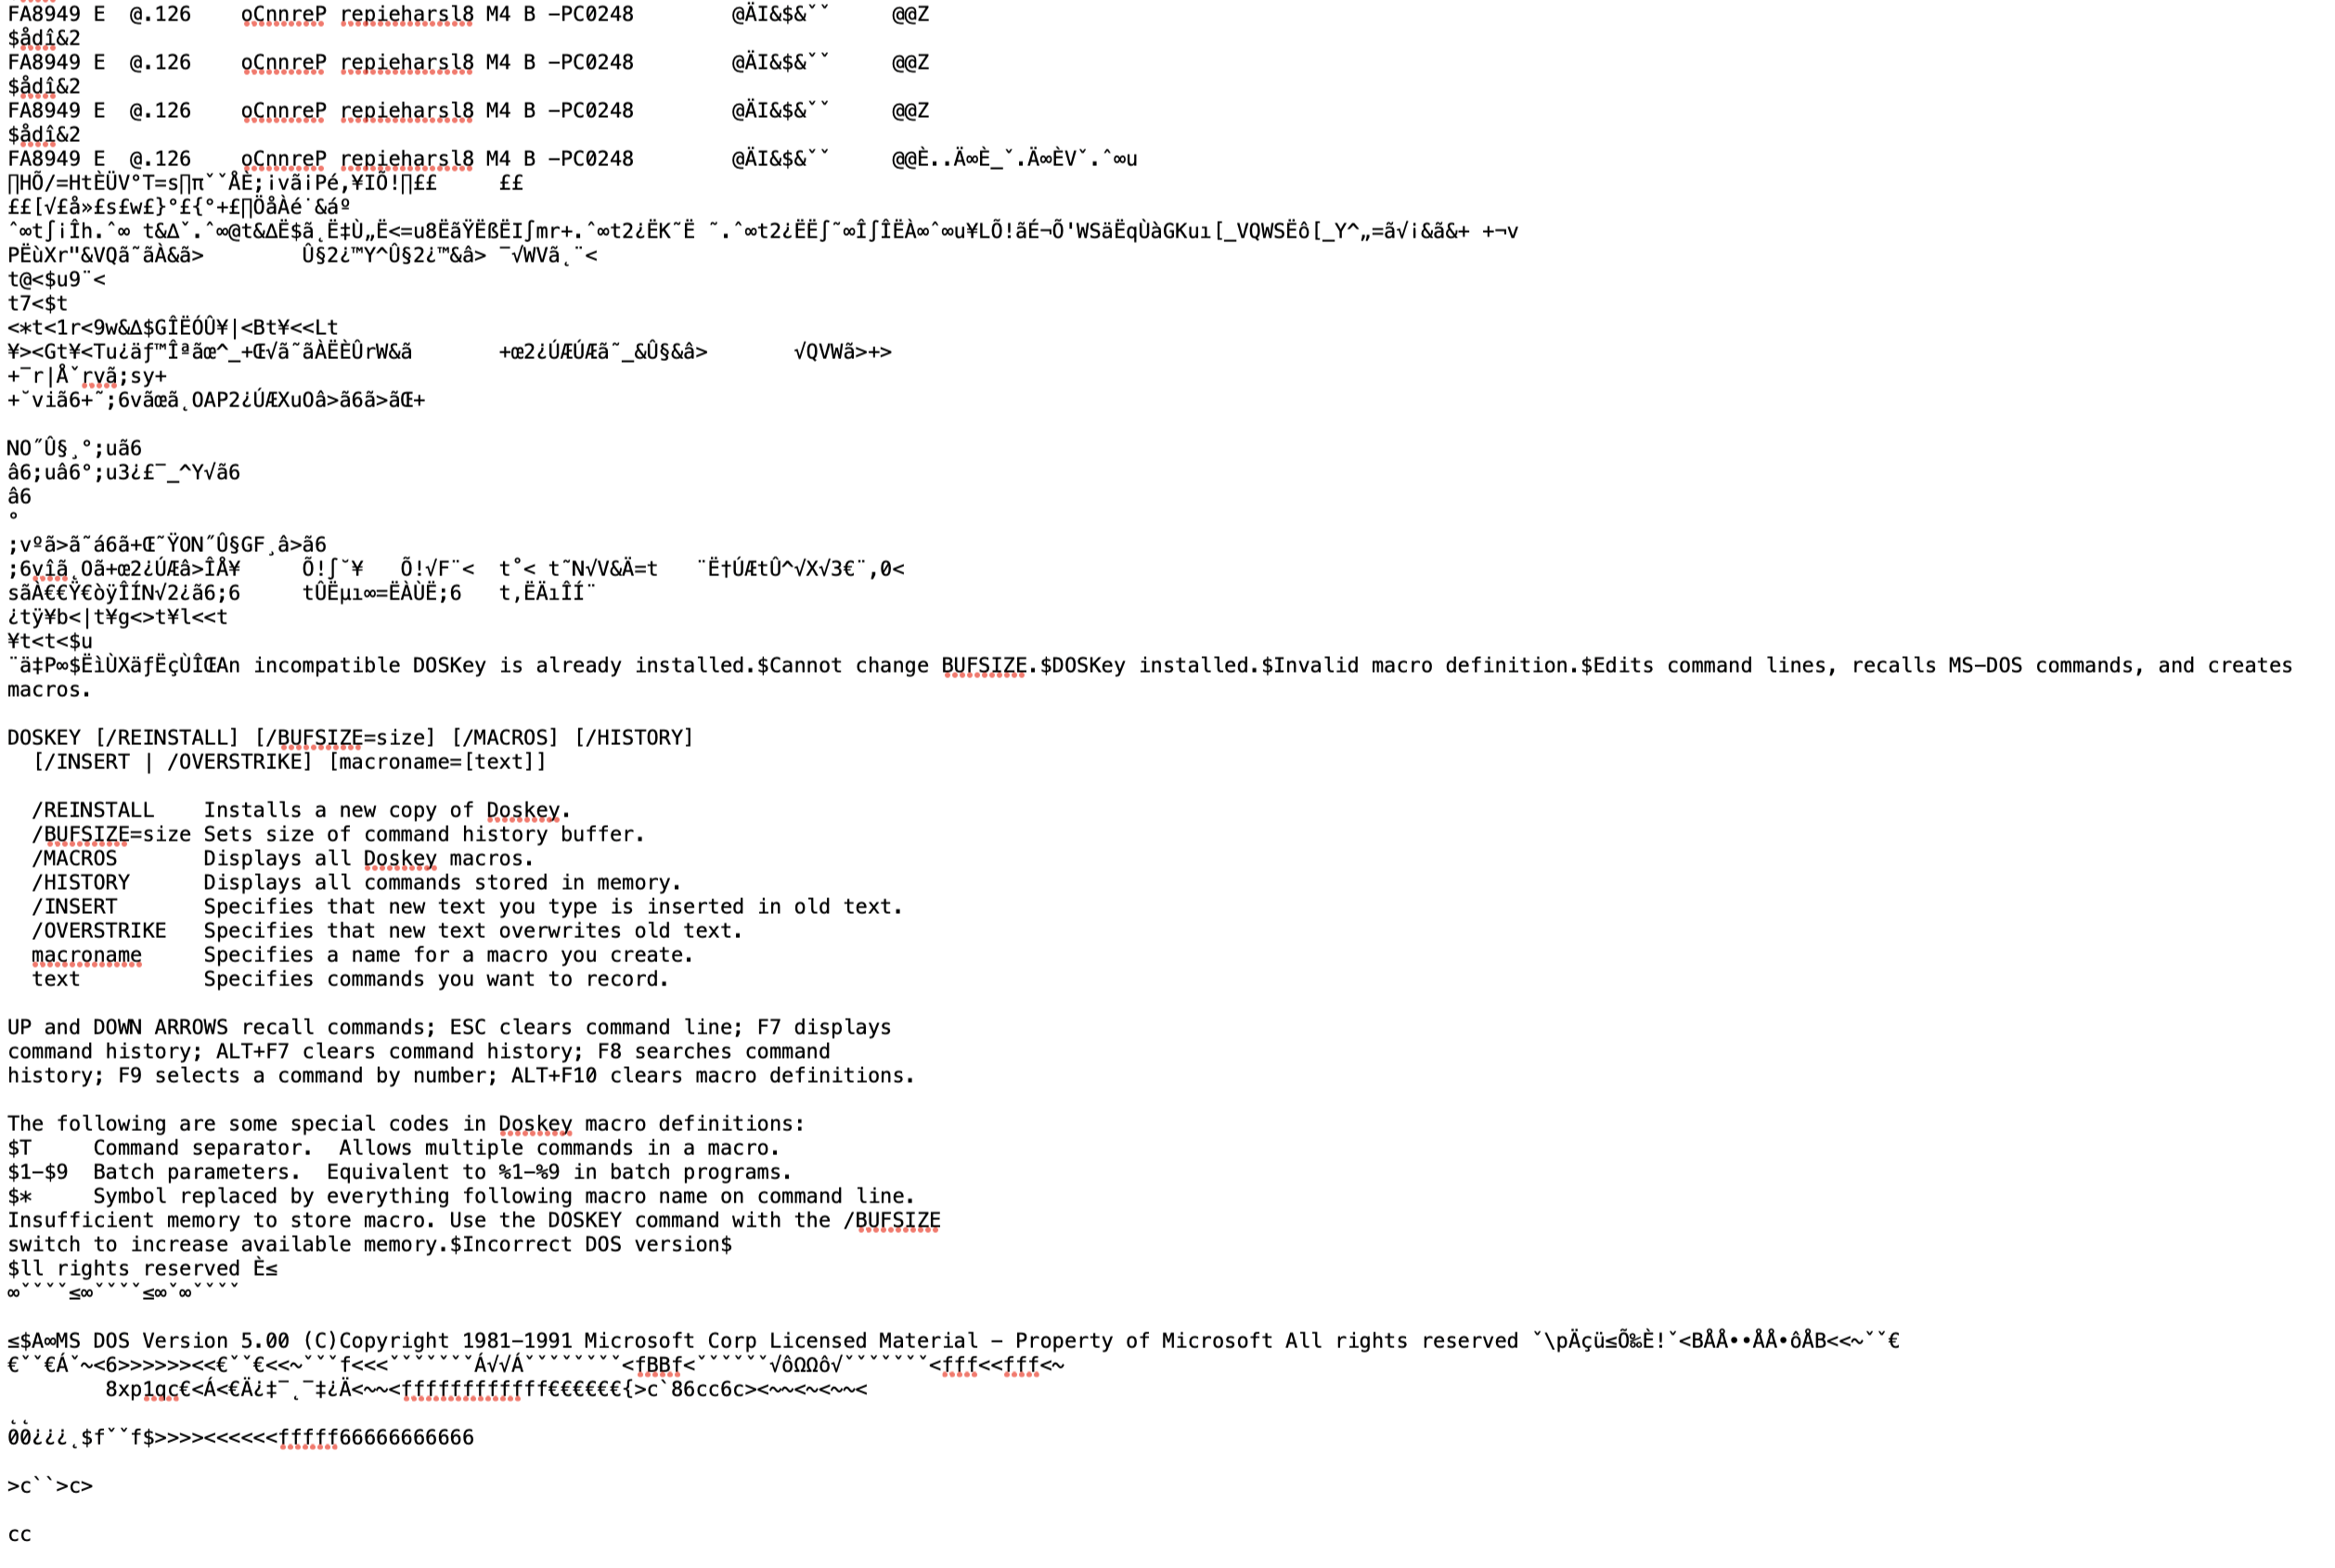
oCnnreP repieharsl8 M4 B -PC0248
This is an interesting string as it has a lot of understandable info, but contains a number of out of order characters. It should read
Conner Peripherals 84MB -PC2048
Another question was why is this string being repeated so frequently and where is it coming from?
Bringing my hope back was the fact that DMDE was able to detect a 85mb partition inside of the alleged 2.2tb drive, indicating that the partition table may be intact
There were large chunks inside of the exe's of the following string:
oCnnreP repieharsl8 M4 B -PC0248
This is an interesting string as it has a lot of understandable info, but contains a number of out of order characters. It should read
Conner Peripherals 84MB -PC2048
Another question was why is this string being repeated so frequently and where is it coming from?
Bringing my hope back was the fact that DMDE was able to detect a 85mb partition inside of the alleged 2.2tb drive, indicating that the partition table may be intact
 I spent some time reading the available documentation about the hard drive to check the pinout to see if it perhaps wasn't getting enough power to read the correct segments.
Then I noticed that the documentation I was able to find noted the size of the cylinders, heads, and sectors. This information along with the probably manufacturing date made me realize that the firmware may be expecting to get requests in Cylinder Head Sector (CHS) format rather than the more modern Logical Block Addressing (LBA). Attempting to read from the drive with the incorrect addressing scheme would also explain why the drive name string was showing up frequently and had bits flipped inside of the string.
Going with this thought, I got a PCI to 40 pin IDE adapter card chained into a 40 pin IDE to 44 pin IDE female plug. The 44 pin IDE needs a +5v connection on the upper 4 pins in order to power the drive.
The 40 to 44 pin adapter allowed for a Molex connection from the power supply to provide the +5v.
I used a cable from another PSU, plugged in the drive, turned on the host computer, and released some of the magic smoke from the back of the controller board. Trying to figure out what went wrong, I checked the Molex with my multimeter and to my great disappointment found that the +5v was providing +12v and the +12v was providing +3.3v. Due to my excitement induced haste I failed to verify the pin power was correct before plugging in the drive which turned out to be an incredibly preventable mistake that cost me months of time.
In a last-ditch effort, I disassembled the hard drive to get a better look at the controller board, hoping that the circuit had some sort of overvoltage protection or sacrificial component which I would be able to replace in order to get the board functioning again. Unfortunately, overvoltage didn't seem to be a consideration that the engineers at Conner had in mind, and it was an undetermined microchip that got fried but didn't seem to have left any burn marks to narrow down which one.
### Donor Drive
Defeated, I began moving forward with plan C. The only option I could think of to get this project back on track was to find a donor hard drive of the same make and model and switch the controller boards between them. This would only work if the firmware on the two were the same and there was no drive specific data such as partition maps required from the original board. Seeing as I had likely wiped all of this data as a child, I figured it was likely that a swap would be workable.
After spending some time browsing the internet for suitable drives that looked as though they may be compatable, the only one I could find for under $150 was listed on what has turned out to be perhaps my new favorite specialty website A1 Used Computers.
The company was in Australia and didn't seem to have much of a web presence. The website was fairly boilerplate with lots of stock images and a generic company name. I've seen a number of sites like this that turned out to be scams targeting people looking for some difficult to obtain item and then offering the item for a low price. You'd order and it would never show up. However what gave A1 Used Computers credence to me was the fact that I doubted any scammer would waste any time to bother listing computer power cables from the 1990's for sale in order to scam people out of 10 dollars.
In early December time I decided to take a chance and order the drive for the reasonable price of $60 AUD.
The order status switched to processing and then nothing happened for a couple weeks. Growing slightly concerned I had actually been scammed (this would be all too embarrassing seeing as I work in the cybersecurity field), I placed a call to one of the numbers listed on the website which was quickly answered by a man who took my order number and e-mail and said he would follow up.
I spent some time reading the available documentation about the hard drive to check the pinout to see if it perhaps wasn't getting enough power to read the correct segments.
Then I noticed that the documentation I was able to find noted the size of the cylinders, heads, and sectors. This information along with the probably manufacturing date made me realize that the firmware may be expecting to get requests in Cylinder Head Sector (CHS) format rather than the more modern Logical Block Addressing (LBA). Attempting to read from the drive with the incorrect addressing scheme would also explain why the drive name string was showing up frequently and had bits flipped inside of the string.
Going with this thought, I got a PCI to 40 pin IDE adapter card chained into a 40 pin IDE to 44 pin IDE female plug. The 44 pin IDE needs a +5v connection on the upper 4 pins in order to power the drive.
The 40 to 44 pin adapter allowed for a Molex connection from the power supply to provide the +5v.
I used a cable from another PSU, plugged in the drive, turned on the host computer, and released some of the magic smoke from the back of the controller board. Trying to figure out what went wrong, I checked the Molex with my multimeter and to my great disappointment found that the +5v was providing +12v and the +12v was providing +3.3v. Due to my excitement induced haste I failed to verify the pin power was correct before plugging in the drive which turned out to be an incredibly preventable mistake that cost me months of time.
In a last-ditch effort, I disassembled the hard drive to get a better look at the controller board, hoping that the circuit had some sort of overvoltage protection or sacrificial component which I would be able to replace in order to get the board functioning again. Unfortunately, overvoltage didn't seem to be a consideration that the engineers at Conner had in mind, and it was an undetermined microchip that got fried but didn't seem to have left any burn marks to narrow down which one.
### Donor Drive
Defeated, I began moving forward with plan C. The only option I could think of to get this project back on track was to find a donor hard drive of the same make and model and switch the controller boards between them. This would only work if the firmware on the two were the same and there was no drive specific data such as partition maps required from the original board. Seeing as I had likely wiped all of this data as a child, I figured it was likely that a swap would be workable.
After spending some time browsing the internet for suitable drives that looked as though they may be compatable, the only one I could find for under $150 was listed on what has turned out to be perhaps my new favorite specialty website A1 Used Computers.
The company was in Australia and didn't seem to have much of a web presence. The website was fairly boilerplate with lots of stock images and a generic company name. I've seen a number of sites like this that turned out to be scams targeting people looking for some difficult to obtain item and then offering the item for a low price. You'd order and it would never show up. However what gave A1 Used Computers credence to me was the fact that I doubted any scammer would waste any time to bother listing computer power cables from the 1990's for sale in order to scam people out of 10 dollars.
In early December time I decided to take a chance and order the drive for the reasonable price of $60 AUD.
The order status switched to processing and then nothing happened for a couple weeks. Growing slightly concerned I had actually been scammed (this would be all too embarrassing seeing as I work in the cybersecurity field), I placed a call to one of the numbers listed on the website which was quickly answered by a man who took my order number and e-mail and said he would follow up.
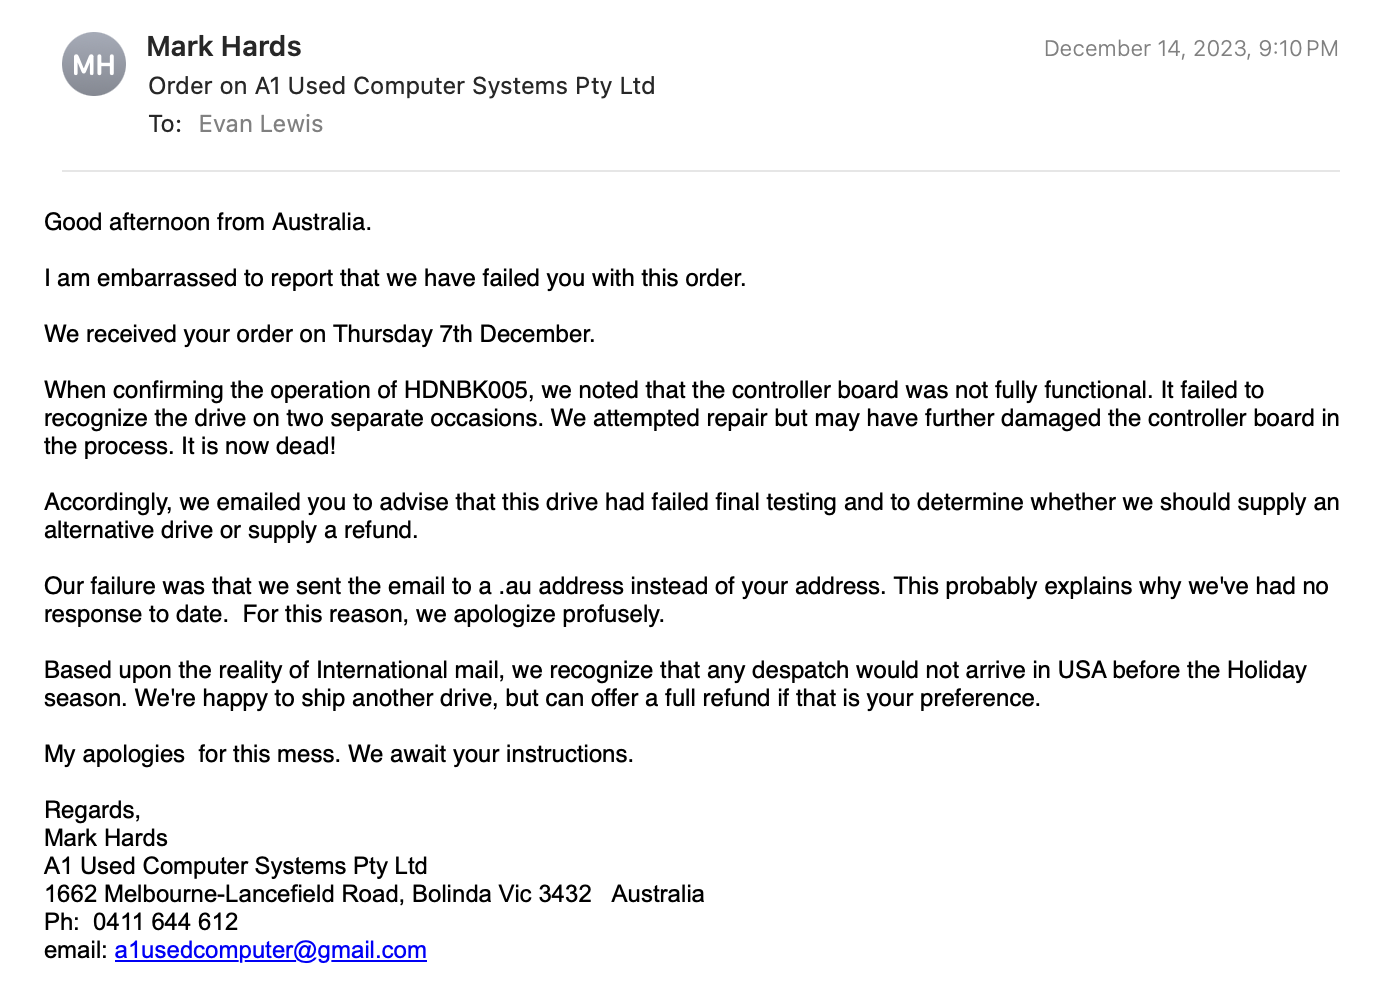 Within a day or two I received an incredibly thorough reply. Apparently, the board on the hard drive which they had pulled for me failed to operate acceptably when they did a quality test before shipping the drive. Then somewhat appropriately for my situation, they too had killed the board attempting to get it to work for me.
They had attempted to email me asking how I would like to proceed, but had sent it to an email address ending in .au rather than my .com so it never reached my inbox. I asked if they had another drive which they could try to send and luckily they did. They graciously informed me that it would not show up before Christmas, but seeing as this was a personal project that made no difference to me and asked them to send it out.
I want to take note here of the exceptional service from Mark and A1 Used Computers. Between actually validating products before shipping them out, incredible and friendly support, and having a very large inventory of fairly rare items, this is an excellent company to purchase from!
A few weeks later I had a second Christmas when the order showed up at my door. I quickly unpacked it and checked the drives to see if they seemed to be exactly the same; mainly looking at those hand wired microchip jumpers.
Within a day or two I received an incredibly thorough reply. Apparently, the board on the hard drive which they had pulled for me failed to operate acceptably when they did a quality test before shipping the drive. Then somewhat appropriately for my situation, they too had killed the board attempting to get it to work for me.
They had attempted to email me asking how I would like to proceed, but had sent it to an email address ending in .au rather than my .com so it never reached my inbox. I asked if they had another drive which they could try to send and luckily they did. They graciously informed me that it would not show up before Christmas, but seeing as this was a personal project that made no difference to me and asked them to send it out.
I want to take note here of the exceptional service from Mark and A1 Used Computers. Between actually validating products before shipping them out, incredible and friendly support, and having a very large inventory of fairly rare items, this is an excellent company to purchase from!
A few weeks later I had a second Christmas when the order showed up at my door. I quickly unpacked it and checked the drives to see if they seemed to be exactly the same; mainly looking at those hand wired microchip jumpers.

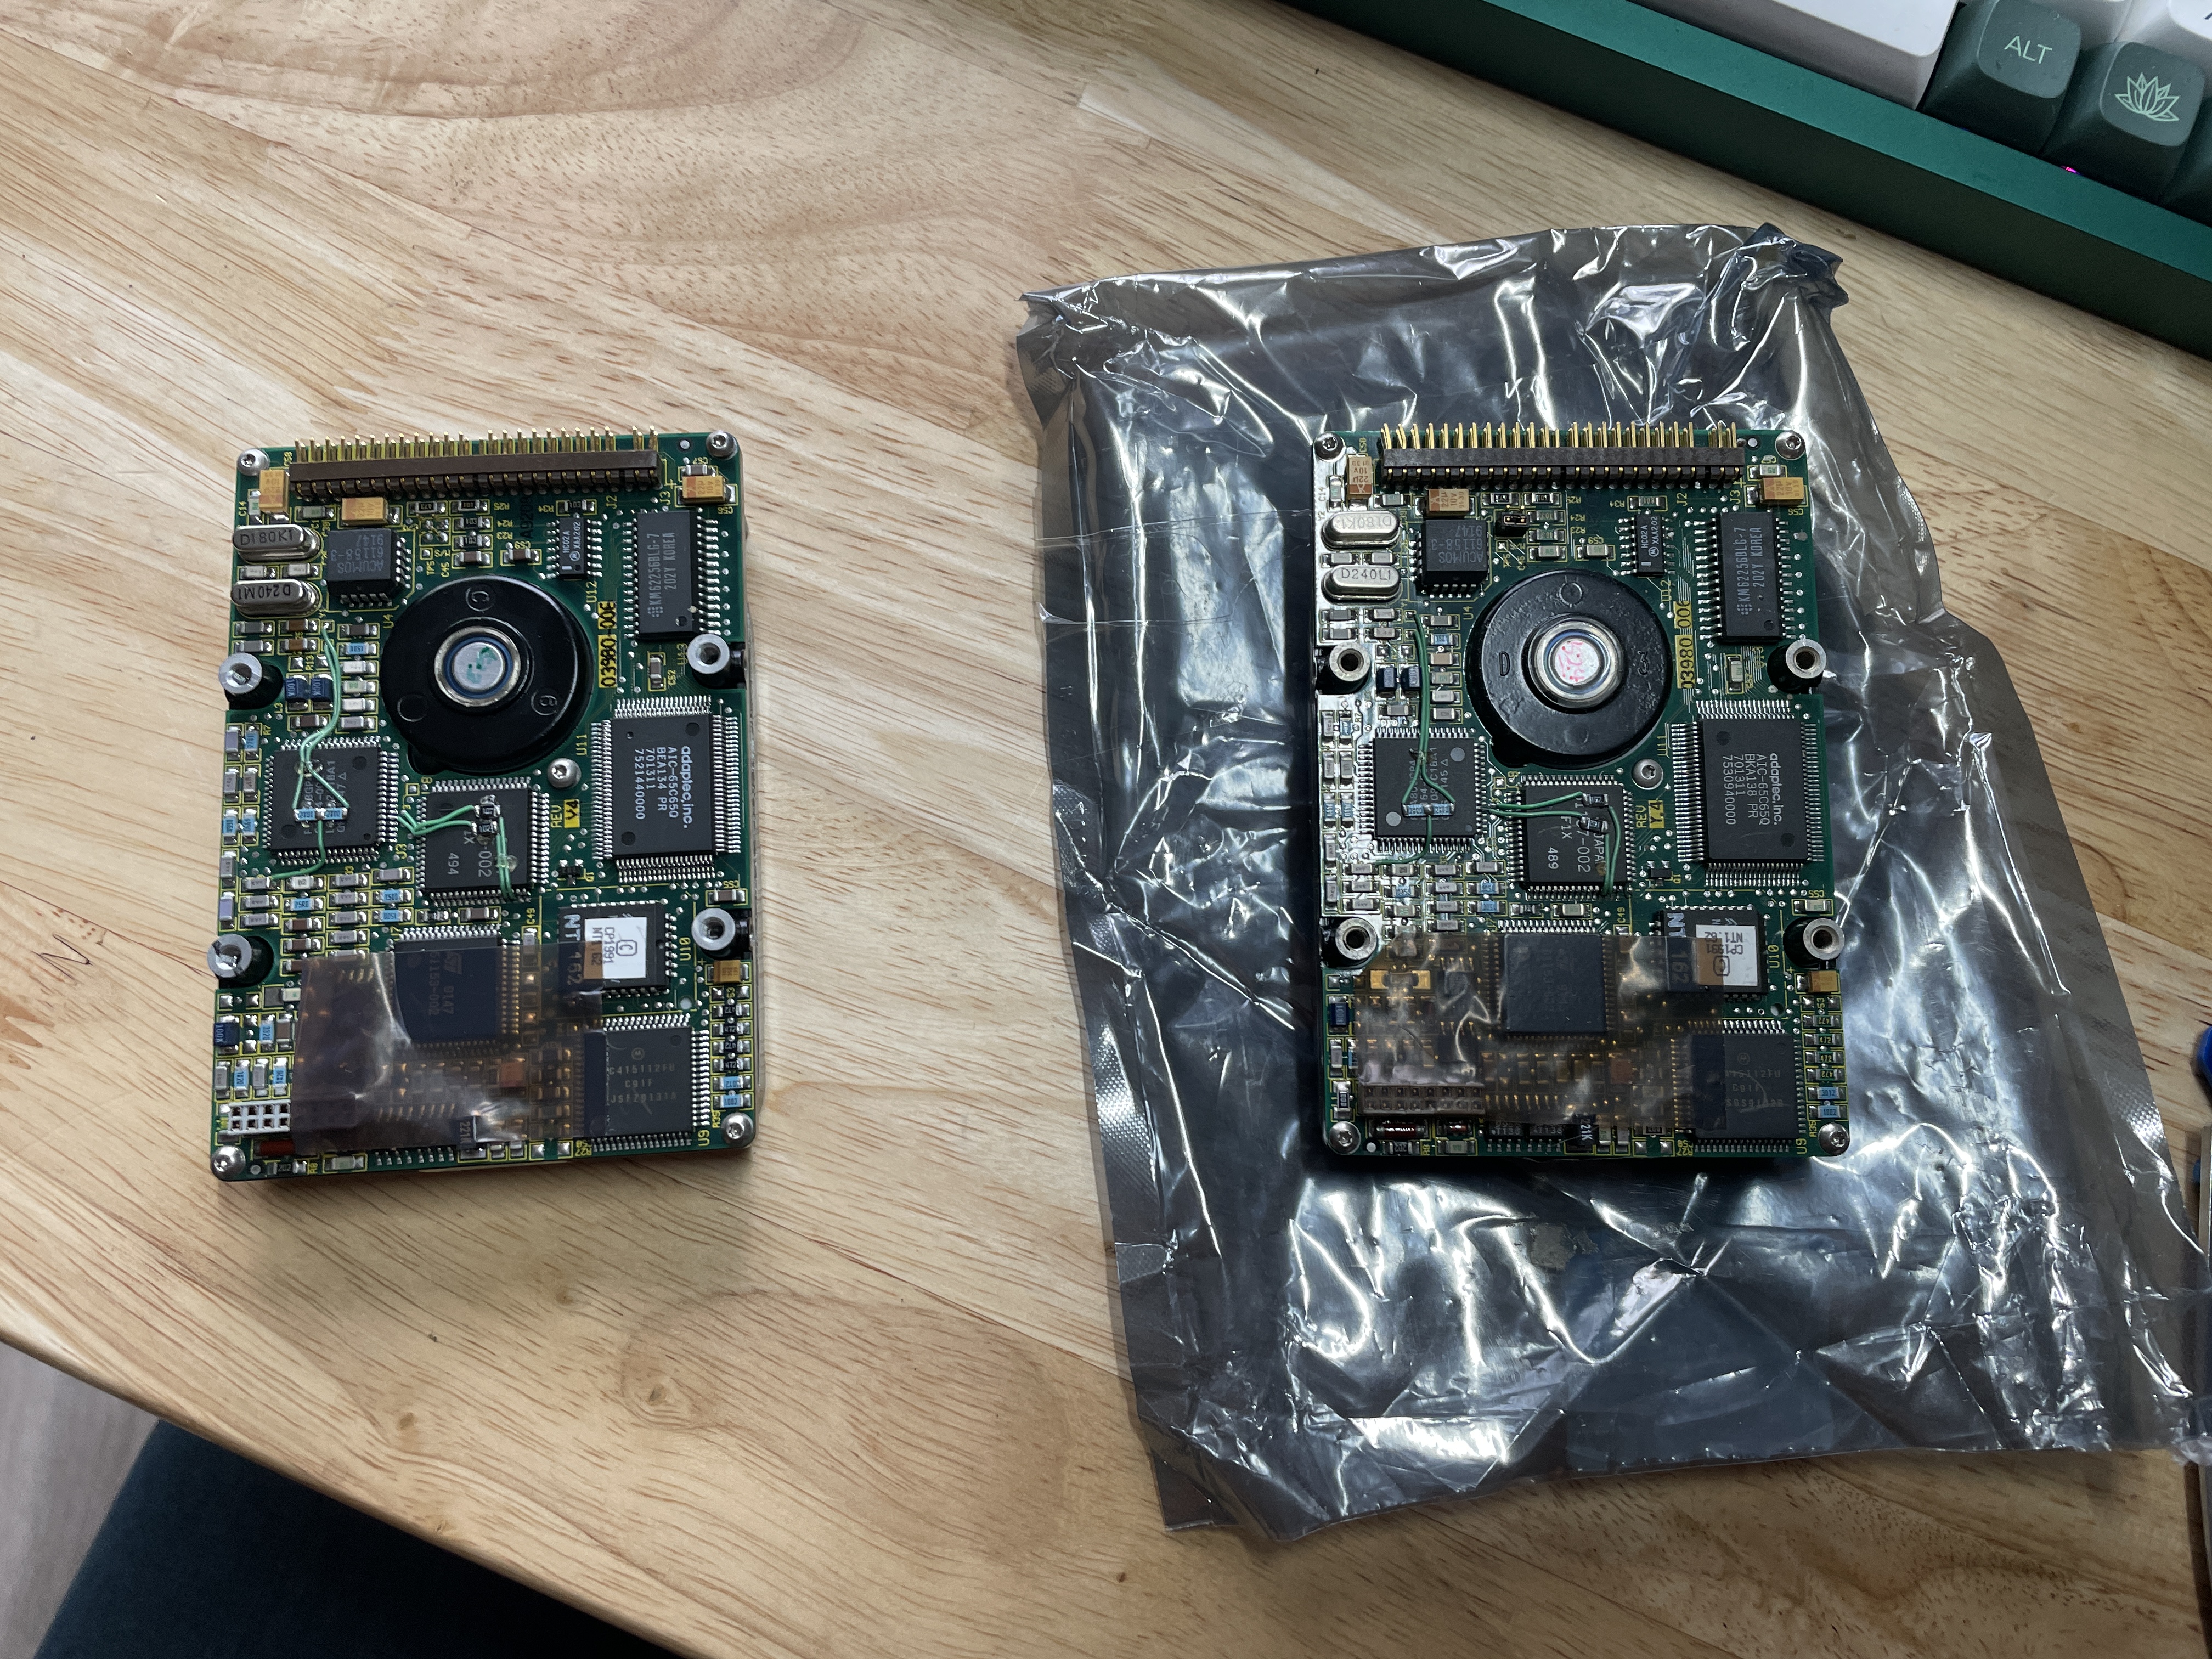 I swapped the boards and brought them into my (not-so) cleanroom
 After checking the Molex pinouts multiple times with my multimeter and seeing that they were correct, I decided to just cut the +12v line as well so that I was only ever going to have a max voltage of an acceptable +5v.
### It Lives
I plugged the Franken-drive in and hit my computer power button. Nothing caught on fire this time and I heard the hard drive begin spinning. And then shutting down. This seemed like one of my original problems of the sticky bumper rubber.
So I repeated my fix steps for this. Take the hard drive enclosure off, pop the arm off of the rubber, re-close the enclosure, and power back on. However it didn't go exactly like that. After I opened the enclosure the arm didn't feel stuck like it had the first time. This was odd and when I closed it back up and powered it on nothing had changed. I took the enclosure apart again and started the drive while it was still exposed. This time it started up fine and I could see the arm moving properly. For whatever reason, suddenly there seemed to be some clearance issue inside the enclosre where if the lid was attached the arm would get pinched or stuck in some way and was unable to move.
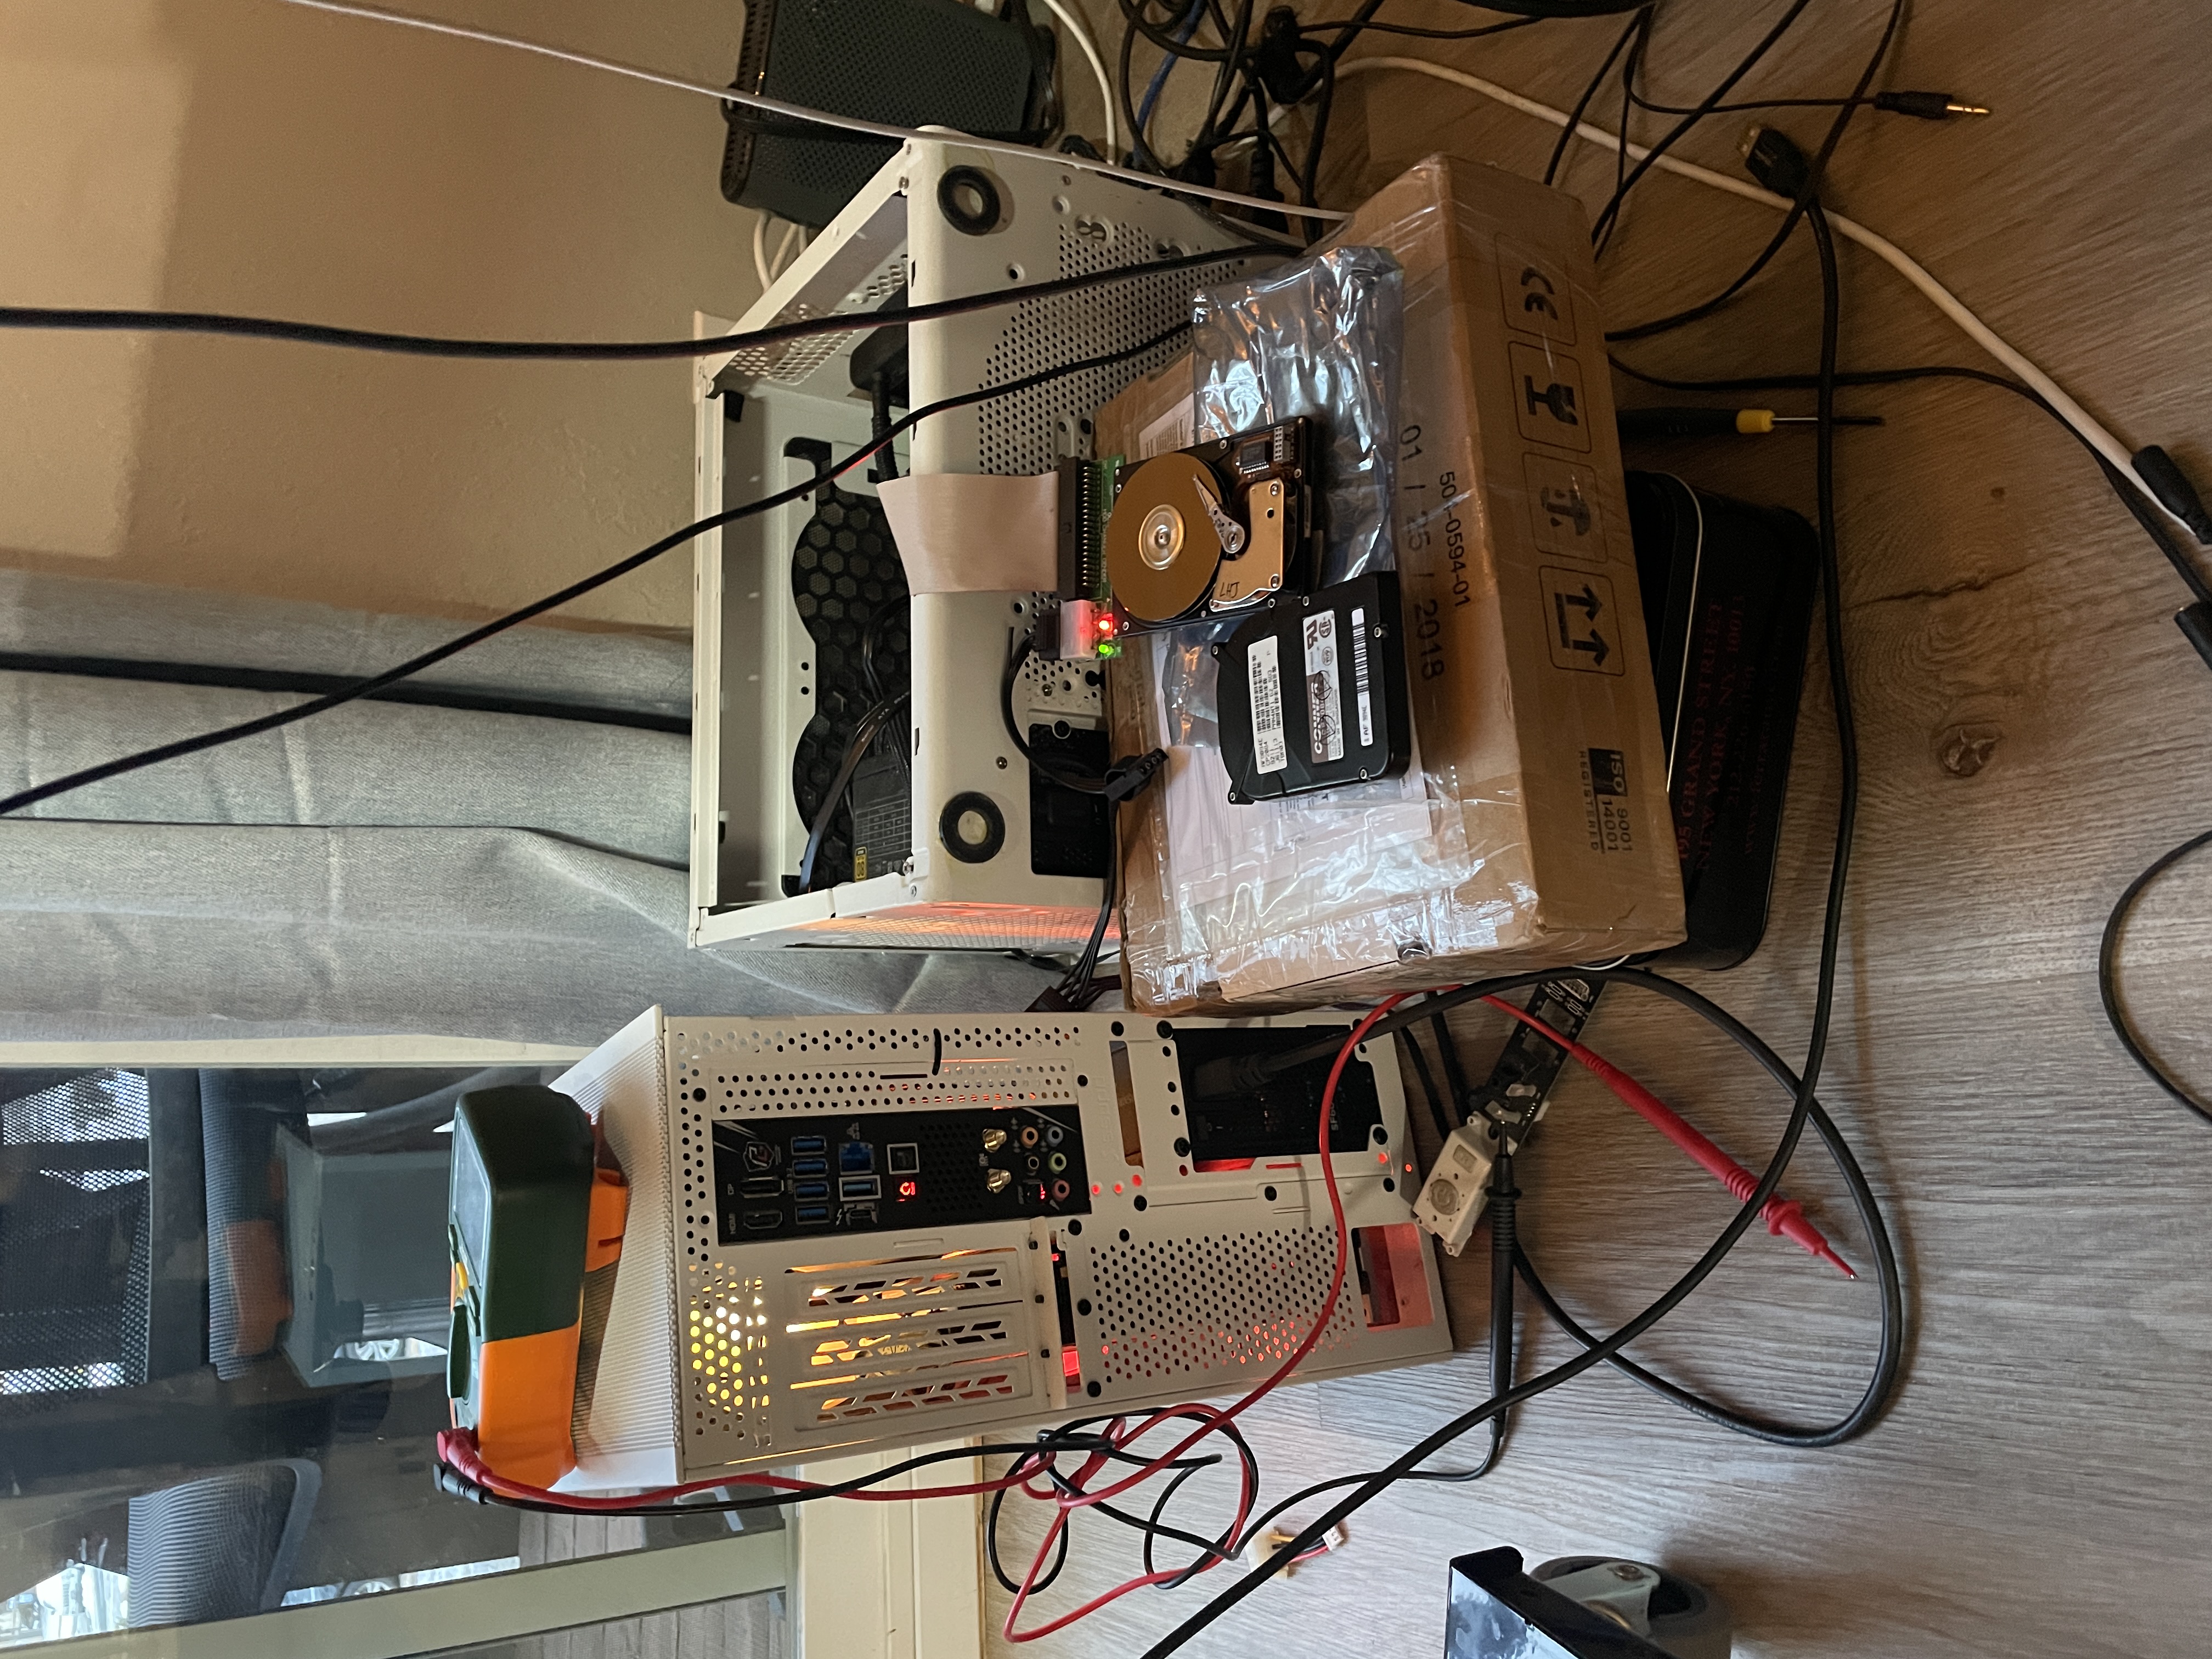
With this information, I took the dog I was dog-sitting out of the cleanroom and decided to just try to extract all of the data quickly. Since I didn't care about this drive working in the future the risky route seemed alright.
With the lid open, I started my computer again and moved quickly in case something decided to give or the data started getting corrupted by dust.
Immediately, I started running DMDE's autodiscover feature. Results started being found and processed! But it was moving a bit too slowly given the risky state the physical drive was in.
I realized that I should just open file explorer and see if it mounted. I'm not sure why I didn't start here. Likely since it seemed so dead and I had swapped the boards there was such a low chance that it would be able to natively mount.
To my surprise it had actually mounted successfully to Windows! I suppose all of that backwards compatibility is not for nil.
Evidently, I had damaged the boot table rather than the partition table when I was a child.
I dragged all of the files over to my desktop and saw the read arm being furiously flicking around for about a minute. With a copy on my much more reliable SSD I then quickly backed up the results into my cloud.
Within a few minutes of starting my computer, I had recovered all the data which had be written off 20 years ago.
TLDR: If your 84mb hard drive shows up as 2.2tb, connect it directly to the motherboard using IDE
After checking the Molex pinouts multiple times with my multimeter and seeing that they were correct, I decided to just cut the +12v line as well so that I was only ever going to have a max voltage of an acceptable +5v.
### It Lives
I plugged the Franken-drive in and hit my computer power button. Nothing caught on fire this time and I heard the hard drive begin spinning. And then shutting down. This seemed like one of my original problems of the sticky bumper rubber.
So I repeated my fix steps for this. Take the hard drive enclosure off, pop the arm off of the rubber, re-close the enclosure, and power back on. However it didn't go exactly like that. After I opened the enclosure the arm didn't feel stuck like it had the first time. This was odd and when I closed it back up and powered it on nothing had changed. I took the enclosure apart again and started the drive while it was still exposed. This time it started up fine and I could see the arm moving properly. For whatever reason, suddenly there seemed to be some clearance issue inside the enclosre where if the lid was attached the arm would get pinched or stuck in some way and was unable to move.
With this information, I took the dog I was dog-sitting out of the cleanroom and decided to just try to extract all of the data quickly. Since I didn't care about this drive working in the future the risky route seemed alright.
With the lid open, I started my computer again and moved quickly in case something decided to give or the data started getting corrupted by dust.
Immediately, I started running DMDE's autodiscover feature. Results started being found and processed! But it was moving a bit too slowly given the risky state the physical drive was in.
I realized that I should just open file explorer and see if it mounted. I'm not sure why I didn't start here. Likely since it seemed so dead and I had swapped the boards there was such a low chance that it would be able to natively mount.
To my surprise it had actually mounted successfully to Windows! I suppose all of that backwards compatibility is not for nil.
Evidently, I had damaged the boot table rather than the partition table when I was a child.
I dragged all of the files over to my desktop and saw the read arm being furiously flicking around for about a minute. With a copy on my much more reliable SSD I then quickly backed up the results into my cloud.
Within a few minutes of starting my computer, I had recovered all the data which had be written off 20 years ago.
TLDR: If your 84mb hard drive shows up as 2.2tb, connect it directly to the motherboard using IDE